|
IF the top batten of a Neil Pryde Racing/Slalom sail breaks ...
Vulnerability (how prone things are to break down) – often caused by unnecessary complexity (as for instance the Neil Pryde Ultracams IMVHO) – is one thing. Another matter is how complicated repairing is IF a part of the sail is damaged.
An example of a comparable (and unnecessary, I think) complicated repairing procedure is if you have to shift the top batten after a breakage. It’s not that top battens break often (to my knowledge, even though the top batten is made by a small diameter tube). But WHEN it happens, you probably won’t call the replacement procedure implicating splitting part of the batten pocket and having to glue (tape) and sew (perhaps with the help from a sail repairman?) the parts in place again for especially user friendly. Normally it’s plenty of work in removing a broken batten (common for all sail brands), so why is it absolutely necessary to challenge the temper of an unlucky guy even more?
P. s.: This is not the place for comparison between RS Racing/Slalom and race sails from other brands. However, other brands have also focused on the value of saving weight in the top of their sails - for instance North Sails. North has provided their Warp series with a new "superlight Mini.Rocket tensioner", that (admitted) perhaps isn't quite as light as Neil Prydes sewn-in tensioner. On the other hand North has placed their mini-tensioner at the 3 top battens, so all in all North has probably obtained more weight savings than Neil Pryde. Oh - and the "superlight Mini.Rocket tensioner" is as easy to "open" as other "normal" tensioners (no cutting and sewing needed). You can see North' solution here.
|
||
|
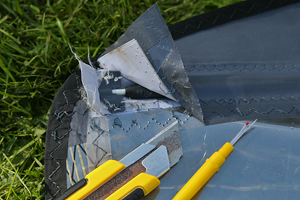
1.
Part of the batten pocket has been opened, reveiling a batten tensioner, that totally hinders replacement of a broken batten - unless you're ready use more drastic methods.
Click the picture to enlarge. |
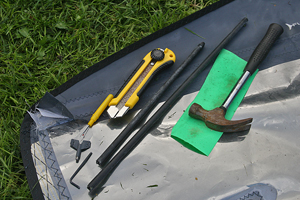
2.
The broken batten has been removed the usual way - i.e. trying to knock it back through the batten pocket material (the green cloth has been placed on the batten pocket for protection purpose during this pretty violent process).
Click the picture to enlarge. |
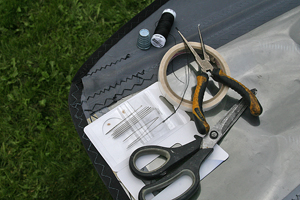
3.
Here (finally) the sail's ready for the sailing again. A new batten has been made and fitted, and the batten tensioner and the batten pocket has been stitched to the sail again. If you're lucky - and have got the bits an pieces ready for hand - it can be done in a couple of hours (and no time for siesta!). Some of the necessary ingredients are thread, needle, a pair of scissors, doubble sided tape and a pair of tongs.
Click the picture to enlarge. |