November 2016.
DIY: Transforming a Starboard iSonic 2016 into an iSonic 2017.
It's really not a
problem to modify the tail of your slalom board. In fact it's a pretty
simple "operation", and with just a little modesty and creative realism
chances are great that the performance of your board benefits. If you
have just a vague idea of
how tweaking the tail shape influences the
performance, and if you
realize what kind of performance you want, then
just go ahead. I mean, with the huge variety of tail shapes presented to
us by the companies in the last 5-6 years, it's pretty obvious that
designing tails is no exact science. It's trial and error, and your trial
may be as good as that of the professional board shapers.
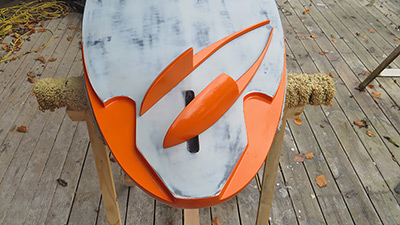
Here's an example of
a "unauthorized" board tail modification:
http://peterman.dk/windsurf-fanatic-falcon152-1000.html. Of course
I'm biased, but I think the tail modification gave me at least some of
the change in performance, I sought.
However, if you think it's too risky to make your own designs, sometimes you are given the opportunity to replicate the modifications of a board model from one year to the next. A golden opportunity in this respect is to replicate the changes in tail shapes of the 2017 iSonics relative to the 2016 iSonics - simply because the changes are so well described.
Apart from the iSonic
117 (the former 114) Starboard has given up the very narrow tails and
the complex stepped cut-outs (in 2 depths, 10 mm and 20 mm) for the 2017
iSonics.
Starboard has
motivated these changes on their homepage (http://www.star-board-windsurfing.com/2017/products/boards/isonic).
Personally, I suspect Starboard has realized that the last generations
of iSonics gradually have
moved too far away from one of the
classic iSonic virtues (control) in an attempt to obtain a higher
(theoretical)
top
speed.
According to the
descriptions on the Starboard homepage, the modifications of the 2017
iSonics compared to the 2016 iSonics are all about adding some material.
Adding material to the deepest (20 mm) cut-out to level it with the 10
mm cut-out, and adding material to make the tail more round.
Adding material to
the tail of your iSonic
2016
ought to be a piece of cake for a DIY guy, so
lets try. In this case I'll try to transform a 2016 iSonic 97 into a
2017 iSonic 97.
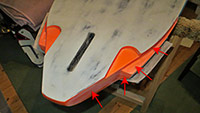
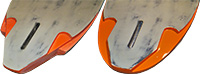
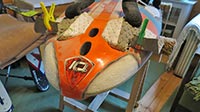
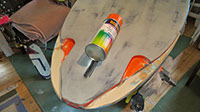
1.
Preparation: The
relevant
areas of the tail (the "contact") areas) are lightly sanded and
cleaned.
Click the picture to enlarge.
2.
A couple of 10 mm
pieces of
veneer are carefully
shaped to fit in the deepest (20 mm) cut-outs and extended to the rear
to form the basis of a more round tail. Remember to leave room for some
weave to be laminated
on the
veneer.
The veneer pieces are
glued to the board with epoxy mixed with filler (to
obtain a less liquid
consistence). Excess epoxy is wiped away.
In the picture the veneer pieces is kept in place with tape during the hardening process.
Click the picture to enlarge.
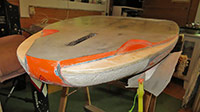
3.
The epoxy has hardened, and excess hardened epoxy is sanded away.
Click the picture to enlarge.
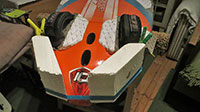
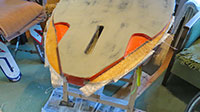
4.
Two pieces of roughly
shaped Styrofoam (Flamingo) are glued (again epoxy with filler)
to the tail and the
rear parts of the veneer. Excess epoxy is wiped away.
Click the picture to enlarge.
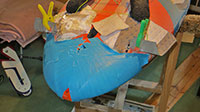
5.
The Styrofoam pieces are carefully shaped in detail. Remember to leave room for some weave - or whatever you'll laminate on the Styrofoam.
Click the picture to enlarge.
6.
Before the lamination job it's vital to sand away paint in small areas next to the veneer/Styrofoam. In this way the epoxy filled weave can bond securely to the board and make a tight and smooth transition.
Click the picture to enlarge.
7.
A single layer of glass weave is laminated (using epoxy, this time without filler) to the veneer parts and the small sanded areas on the original tail.
When the epoxy has cured, excess weave is cut/sanded away.
Click the picture to enlarge.
8.
On the Styrofoam parts I've chosen to laminate one layer of glass weave, then a flexible layer of sandwich cloth, and lastly a layer of glass weave.
You can
probably get away with 3-4 layers of glass weave and forget all about
the sandwich cloth.
I've chosen
to use
tape to squeeze excess epoxy out of the laminate (to save weight and to
avoid trapped air) - but it's not necessary.
Click the picture to enlarge.

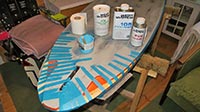
9.
I've entered the sanding/filling process to have at smooth surface - using blue epoxy filler and yellowish polyester filler.
It's a lot easier and quicker - and plenty sufficient - to use polyester filler only.
Click the picture to enlarge.
10.
More sanding and filling ...
Please notice the spray can. It's probably not the exact right colour (RAL 2004, Pure Orange), but it's good enough for me. According to the "Starboard Color Guide Chart" the right colour is "Orange 021 C".
Click the picture to enlarge.

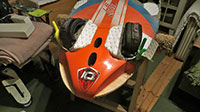
11.
The upper side of the tail is spray painted.
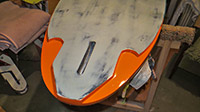
12.
The cut-outs are spray painted.
Click the pictures to enlarge.
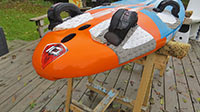
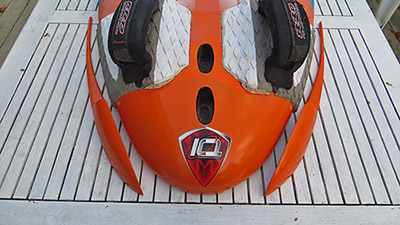
13.
The pads are glued on (with contact cement ("Pattex")) and the straps are fixed.

14.
Ready for the water ...
Click the pictures to enlarge.
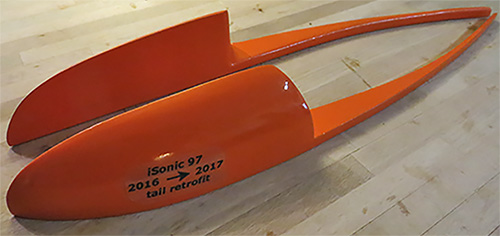
An alternative.
The original thought was to make a couple of separate "prostheses" that could be installed and removed at will. This way you could choose to sail the board as a 2016 iSonic 97 or as a 2017 iSonic 97 in a comparative way. Yes, you could even sail the board with a "prostheses" installed in only one side of the board to have a clear opinion if the 2017 iSonics with the new tail really gives you "... some added float and power for faster and more forgiving jibe ..." compared with the 2016 iSonic (as Starboard claims).
In fact, a couple of "prostheses" were made, and they happened fit my 2016 iSonic 97 nicely. However, as the manufacturing process was pretty elaborate, I chose to illustrate a somewhat simpler way to transform the board.
Imagine if Starboard regularly released some "retro-fit" kits, so that you could update your older iSonic. Lets see, if the alternatives were to replace your iSonic 2016 with the brand new 2017 model (suggested net prize: 1500 Euro), or to buy an "iSonic 2016 to 2017 tail retrofit" kit from Starboard (suggested prize: 150 Euro) - what would you choose?
Well, probably just
a Fata Morgana.