|
Click the pictures for enlargements.
Fig. 1
Fig. 2
Fig. 3
Fig. 4
Fig. 5
Fig. 6
Fig 7
Fig. 8
Fig. 9
Click the pictures for enlargements.
|
Do-It-Yourself kite board chair.
If you happen to windsurf or live close to a beach used by kite boarders, there's always a chance that you witness a kite board being destroyed. Like wise - if you regularly visit your windsurf-/kite board dealer, there's a chance, that you witness a kite boarder trying to persuade the dealer to swap his destroyed board within the guarantee. Anyway, kite boards happen to break to pieces pretty often, and no matter how superficial your contact to the kite boarder community is, there's always a chance to have a broken kite board almost for free.
What's a "broken kite board"? Well, very (most?) often a kite board is discarded simply because of de-lamination. And a de-laminated kite board is very easy to fix - perhaps not to a standard, so that it can resume it's life as a kite board, but at least to a standard, so that it can be used for a kite board chair.
Just to finish the kite board repairing issue: A de-laminated kite board is very easy fixed by simply injecting some epoxy to the de-laminated parts of the board, squeezing the board by means of some clamps (and perhaps some pieces of veneer to distribute the press) - and wait for the epoxy to harden.
--
I'm sure a kite board chair can be made in a thousand ways, and the one described here is only one (and certainly not the best) way. However, it's a way that guarantee that the proportions don't go totally wrong.
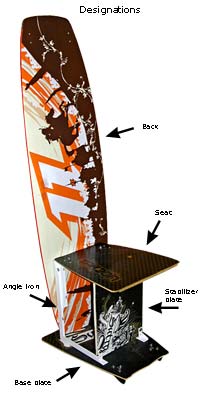
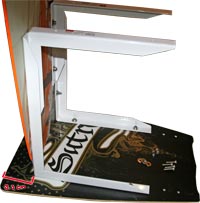
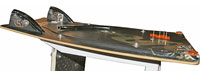
Just to be sure we talk about the same stuff, fig. 1 (click the picture to enlarge) show a finished kite board chair with the designations that shall be used here.
You need: 2 (repaired) kite boards, 2 angle irons 30 cm X 40 cm, 2 angle Irons 30 cm X 25 cm, a number of M6 bolts (2 - 2.5 cm in length), nuts and washers.
--
A.
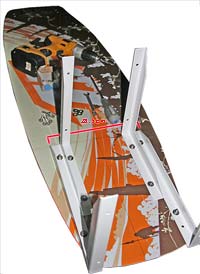
Start with the chair back (fig. 2, click the picture to enlarge). You place the angle irons according to the measures in fig. 3 (click the picture to enlarge) and bolt them to the back.
B.
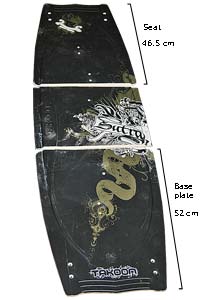
Now take the other kite board (here the black Takoon kite board) and separate it in three pieces according to the measures in fig. 4 (click the picture to enlarge). The middle part of the board is for later use.
C.
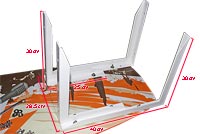
Bolt the "base plate" (upside down) to the back according to the measure in fig. 5 (click the picture to enlarge).
D.
Bolt the seat (upside down) to the back (fig. 6, click the picture to enlarge). You might choose to sink the two forward bolts and fill some putty in the holes - or not!
E.
From the middle part of the back-to-seat kite board you make a "stabilizer" plate to fit between the angle irons and the base plate and seat (fig. 7, click the picture to enlarge). If you've used some angle irons of a better and more stabile quality than the ones used here, it's most often not necessary to fit this stabilizer plate at all. If you look closer at a couple of pictures of a finished kite board chair below, you'll find a model without the stabilizer plate. However, quality angle irons are pretty expensive and they contribute a lot the the weight of the chair. In fig. 8 (click the picture to enlarge) you see the stabilizer plate in place - and you also see one way to fix the plate (here by means of 4 small angle irons).
F.
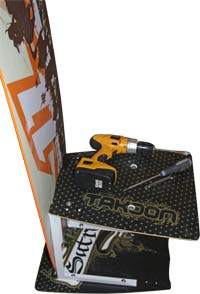
Now, all you need is to angle the chair a little backwards to make it more comfortable to sit on. For this purpose simply place a couple of fins in the "wrong side" under the base plate (fig. 9, click the picture to enlarge). To avoid the chair to scratch your floor you can choose to cover the fins with the plastics from a harness line, and you can also choose so place a couple of "protective nails" (don't know the exact expression) in the back under the base plate.
--
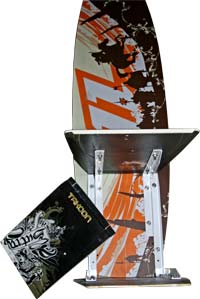
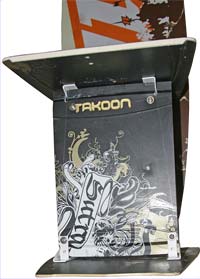
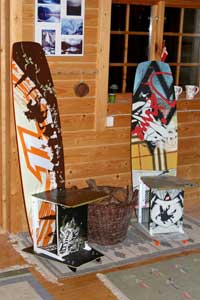
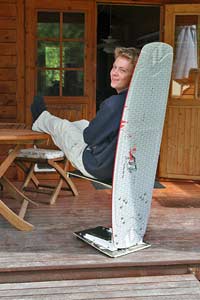
Just to fill the space, here's some pictures of a couple of finished kite board chairs (click the pictures to enlarge):
P. s.: Here are a couple of more pictures (including a kite board table) from a somewhat more natural environment (pic 1,
P. p. s.: It's also pretty simple to make a snowboard chair from your broken snowboard (click here).
|